
I’ve always thought that the theory of developing components is great. I’m a big fan of the canvas app components inside the app, but I haven’t been using the library feature too often. I’m not sure how many have had time to think about when they should use the Component Collection in Copilot Studio. I happened to recognize a situation where a reusable topic process makes sense, so here is one idea of when to use this new feature.
PS. Component Collections are still in preview, so be mindful when you use them.

Send Idea Topic
I like to design agents that are targeted to implement or serve a specific purpose. Copilot is the universal tool, and the agents should serve as experts. In our use case, we created an HR agent and another to assist with the company’s products. Then, we realized that collecting user ideas would be valuable in both processes.
This is where a single controlled process makes sense. We wanted to collect ideas in one management system, so we created a New Idea topic.
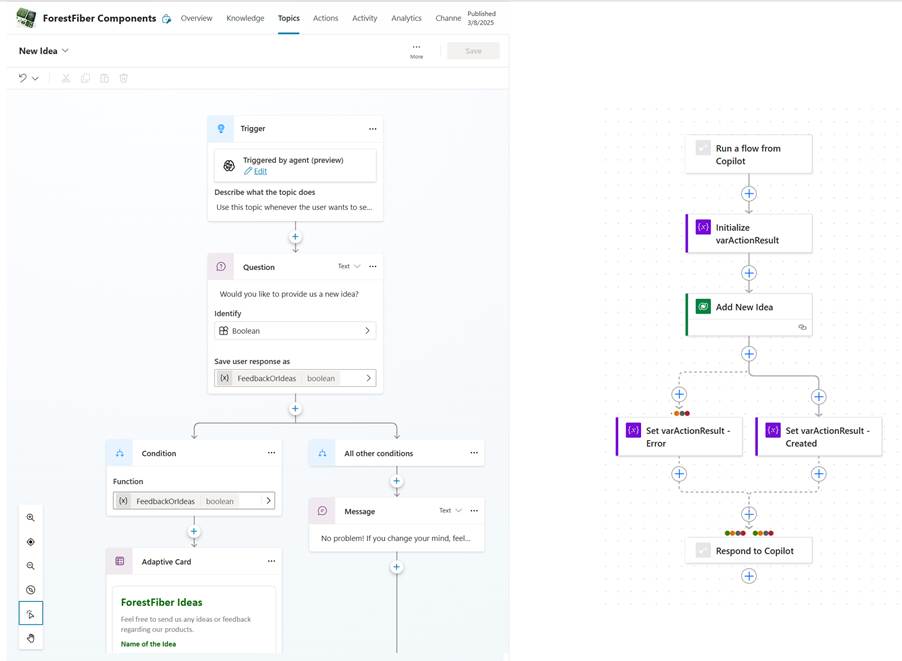
Inside the topic, we collect the idea information with a form and then save it to our Power PPM Idea Management System with a Power Automate action.

Creating Component Collection
When developing component collections, the first thing to consider is your governance and ALM model. Yes, it sounds boring, but it’s important to understand a component’s nature.
In our case, we had one development environment where we created our company’s agents. Of course, each agent is inside a separate Power Platform solution, but the environment is the same. If you now build the component collection inside this same environment, the collection’s elements will be unmanaged.

This means that each agent maker would be able to modify the topic, which would mean that we would lose the goal of a controlled process. I recommend that you create a separate development environment for the collection you want to maintain for others to use. This way, you can publish them as managed solutions for others.
Creating the Collection
First, I recommend creating two solutions in the component collection development environment: one for the agents you use for function development and another for collection. More information from the documentation:
Create and manage custom solutions – Microsoft Copilot Studio | Microsoft Learn
- Then, create an agent in the component collection development environment.
- Set the desired solution for the agent from the advanced settings -menu.

- You can now create the desired functionality normally by adding the topics, action, and knowledge source.
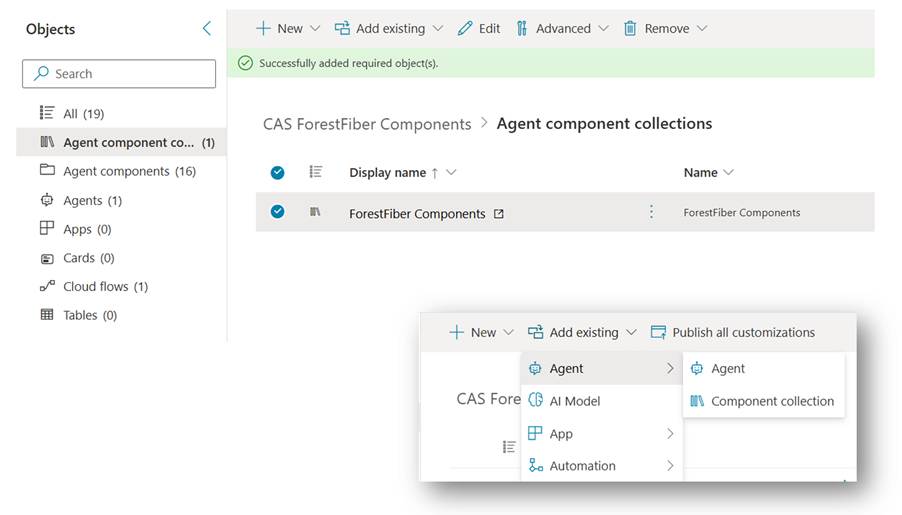
- When everything works, go to Settings and select Component Collections.
- If you’re about to create the first component collection in your environment, select Create. Otherwise, select New.
- Enter a name and a description for your component collection.
- As an important step, you also need to select a solution for the component library.

- Select the components you want to add to the component collection. You can use the categories and the Search field to narrow down the list of components.
- Note! When the makers use the component collections, all of the selected components will be added to an agent.
- So, you need to design appropriate packages and functional entities so unnecessary elements are not added to the agents.

- Select Next, review your collection’s content, and select Create.
Here is the general documentation of the Collection in Microsoft Learn: Create reusable component collections (preview) – Microsoft Copilot Studio | Microsoft Learn
Deployment for Agent Makers
The next step is to bring the components to the agent-maker’s development environment. This can be done with a standard solution ALM process with a few things to consider.
- Open the solution that you selected for the Components Collections.
- We first noticed that some of the dependencies related to the different components were missing from the solution.
- For example, the cloud flow for our action was missing.
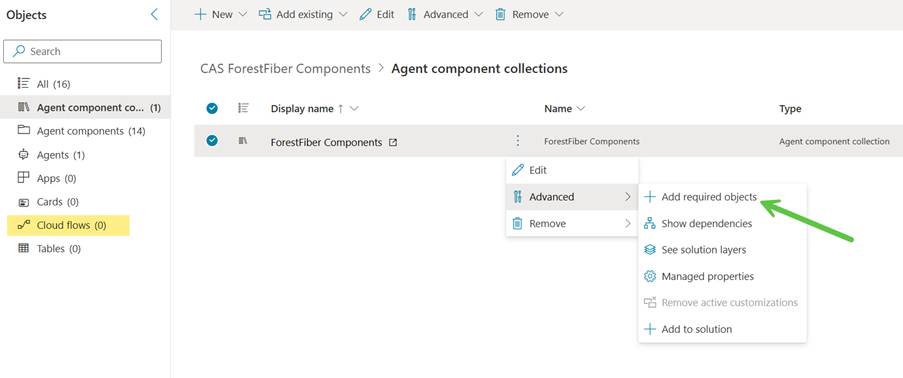
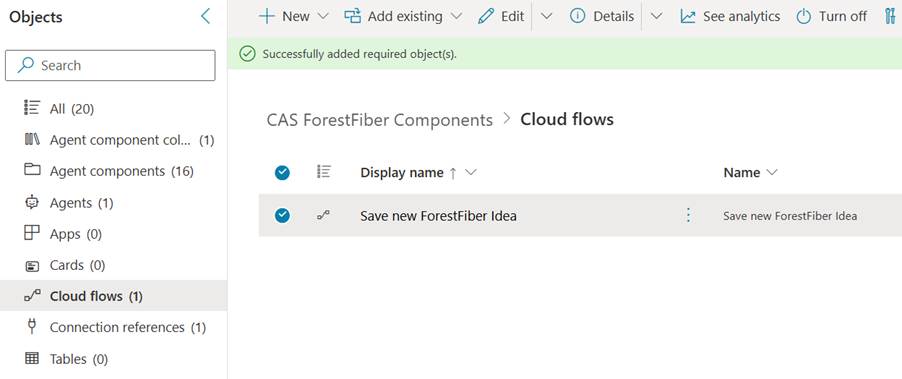
- If this is the case, you can add the object by selecting “Add required object” under the action menu of the component.
- Start with the component collection and then check the other object types.
- For example, we had to update the dependencies for the flows to include the Connection References.
- When all the objects are included, I recommend publishing all customizations to ensure they will be included in the packet correctly.
- After this, you can export the solution and create a zip file you can import into the actual development environment.
- Remember to export the packet in a managed format.

Notes and Usage of the Component
After you have imported the component solution to the maker’s development environment, they can use the managed functions.
- Open the agent that needs the managed functions.
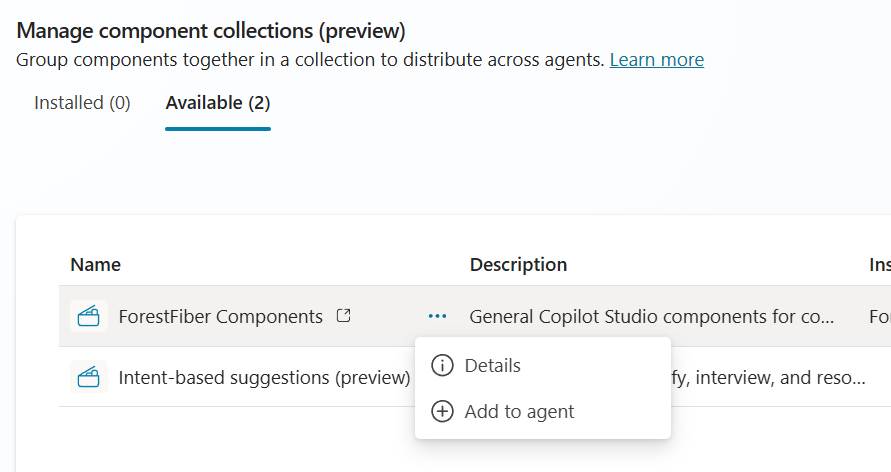
- Go to Settings and select Component Collections.
- Switch to the Available tab to select the desired component collection. You can add the collection from its the action menu.
- Note that all the objects from the collection are added as functionality into your agent.

- You can not delete or change their functionality because they are part of a managed solution. Then again, this was our target because if we need to update the idea process, we can do that in the collection development environment and then update all the agents in the production with a single solution update.
After this, the same controlled topic and experience are used for each agent that activates the collection.

There are a few other things to notice when using component collection.
Firstly, when (you really should) using the regular ALM pattern, you will create a solution packed from dev and bring it over to the following environments. We noticed that the Component Collection was not added automatically to the solution packed of the agent.
You need to manually add the collection from the Add Existing menu. You only need to add the Component Collection, not the object inside of it. This is just kind of a reference for the actual collection in the other solution.
This brings us to the second note. Remember to install the Component Collection solution first to the target environment (test, QA, prod, etc.). Otherwise, you will get an error while deploying the agent solution regarding missing dependencies.

Finding the Collections
As a final hint to the agent makers, you can easily see the available component collection from the Library section of the Copilot Studio Maker Portal.
You can see all the objects related to the collection from the details. You can add the collection to an agent. If the collection is used in some agents, you can even test the function straight from this view, which is quite a nice feature.


Leave a comment